Butter braids and Bows
Butter braid
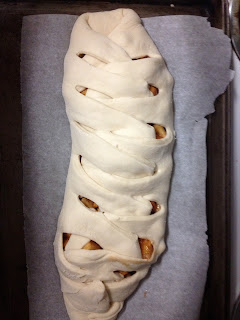
I like most people love these pastries called Butter braids, unfortunately nobody I know has been selling them lately. So I decided I would try to make one of my own. Although my husband isn't a big fan of apples, the Rooster and I love them so I found this recipe and gave it a go. I'm pretty lazy and I HATE waking up early to start bread just so that it has time to rise, so I did everything except bake it the night before. I put it on a parchment paper lined cookie tray and lightly draped it with plastic wrap then stuck it in the fridge for the night.
I'll be the first to admit, this is not the best looking braid ever, but considering it was my first try and I did it at 11 at night, I think it turned out pretty well. I took it out of the fridge to let it get to room temp while I preheated the oven. When the oven was ready I took the plastic wrap off and put it in for 25minutes.
The braid on top kind of disappeared, but it was delicious anyways. The cinnamon apple filling tasted just like an apple pie, YUM. I think next time I'll try a cream cheese version.
Bows
My cousin asked me to make some bows for her wedding. I had never worked with the ribbon that she had chosen before, so I wasn't quite sure what to expect.
The ribbon is called Deco Mesh ribbon and it has a VERY interesting texture. It's appearance is very similar to tulle, but it feels a lot like fishing wire.
 She wanted more of a flowery looking bow than a traditional or christmas gift style bow so something more along the lines of this poof.
It took me a couple of tries to figure out how to go about getting something like that because the Deco Mesh ribbon is REALLY tricky, it catches on itself, scratches fingers and generally has a mind of its own. After a couple of failures I finally came up with a Deco Mesh flower bow.
What you need
A roll of Deco Mesh
A cardboard or poster board circle (Mine were 6")
A low temperature hot glue gun (Do NOT use a high temperature glue gun, it will melt the ribbon!)
After you have let the glue gun heat up put a dab of glue on the edge of the circle. Create a small loop in the bottom of the ribbon and press into the hot glue. Hold it down for a couple of seconds to make sure that the ribbon sticks. (This is another reason not to use the high temp glue gun. Not only will it melt the ribbon but since you will be pressing your finger on it while it's still warm, it may burn the skin right off of your fingers) Do not bother using tape, I tried that first and tape just does not work. Continue looping the bottom of the ribbon and gluing to the circle until you have worked your way around the entire circle. Once you have gone all the way around move the loops a little further into the circle and keep on gluing. If you want a multicolored flower you can cut the ribbon and glue the end to the circle, then add the new ribbon where the other ribbon left off.
When you have reached the end of the ribbon or you have run out of circle to glue the ribbon to, cut the ribbon and put glue on the entire end of the ribbon. Fold it over and push the ribbon into the center of the bow to create a smooth middle. The end result should be something like this.
Overall, these bows are fairly simple to make, but they do require some patience and time. One roll of deco mesh will make 2 flowers that are about 12-16inches across.
Finally Finished!
Here are the regulation corn hole boards all painted and put together. The hubby will get to test them out later this week, so I'll ask him to get some action shots with them.


No comments:
Post a Comment