Thursday, August 15, 2013

Thursday August 15 2013 (Butterbeer cookies)

Browned Butter, Brown Sugar Butterbeer cookies

There are LOTS of Butterbeer cookies out there on the internet, but I couldn't find one that sounded right to me, so I made up my own recipe. Let me just say if you are on a diet DO NOT make these cookies. They smell like heaven and you cannot eat just one. Or at least I couldn't!

The Recipe
1 cup of browned butter
1 cup brown sugar
1/3cup regular sugar
3/4tsp baking soda
1/2tsp salt
1tsp vanilla or butter flavoring
1tsp butterscotch sauce (ice cream topping)
2 2/3cup flour
2 eggs
1 package butterscotch chips ground up
1/3package white chocolate chips ground up

First things first brown your butter. Basically you melt it in a pan and whisk it (so it doesn't burn) until it turns a nice amber color and gets a nutty smell. Whisk constantly and do not leave it unattended or you will burn it! Pour it into a container and put in the fridge to solidify, but do not let it get hard. If you do you will need to take it out and leave it on the counter until it softens back up. Once this has all been done beat the butter and then add the sugars and beat them until they are well creamed together. Add the baking soda, salt, vanilla, butterscotch sauce and mix till incorporated.
Add the flour and eggs and mix till a nice smooth dough is formed.
Put the butterscotch chips and white chocolate chips into a blender or food processor and grind them till they are nice and small. (You can skip this step if you want bigger chunks in your cookies, but by blending it you get a more consistent butterscotch taste to your cookies) Mix the blended chips into the dough. Roll into balls and bake at 325 for 10-15min depending on the size of the cookies.

Monday, August 5, 2013

Monday August 5 2013 (Galaxy Jars)

Galaxy Jars

One of the fun goodies the boys and I made for the goody bags at their birthday party were Galaxies in a Jar. The concept is very similar to the calm down jars that have been floating around Pinterest for a long time. 
First we collected a bunch of smallish clear bottles. Then we filled them 95% full with water. Then we added a few drops of glycerine (they sell this in the soap area at Hobby Lobby) You could also use clear glue, but I already had glycerine on hand. Then we filled the rest of the bottle with glitter and mini-star confetti.
After we had all the glitter and confetti in the bottle with the distilled water and glycerine we put a line of high temperature hot glue around the top of the bottle before we screwed the lid on. This will "kid-proof" the bottle so that there aren't accidental spills in the house.
 I decided to give the lids a coat of glittery spray paint too just to make them even more fun.
 To finish them off we tied a card that reads "Galaxy in a bottle. To infinity and beyond!" to the bottle with some extra ribbon I had.


Monday August 5 2013 (Up-Cycle Piggy banks)

Up-cycle Piggy Banks

So I decided this year that I would provide a craft for the kids to do at the birthday party while the boys open their gifts. This way they don't get bored, and they get another fun thing to take home with them. I was originally going to get each kid a ceramic piggy bank to decorate, but after thinking about how preschoolers and glass don't mix well plus the fact that a decent size ceramic piggy bank starts at $3 I decided I would take the initiative and make piggy banks out of air dry clay, plastic wide mouth jars and paper maché. The first thing I had to do was collect enough plastic containers. Luckily for me my family was able to help me collect a bunch. Then I used air dry clay to make four little legs for each container. I used some painters tape to tape off the threading at the top of the jar so that the lid would still screw on afterwards.
 I attached the legs to the jar using hot glue.
Then I used paper maché to cover the body of each piggy and snout (the lid) separately and allowed them to dry. If you don't do the maché separately you won't be able to remove the lid to open the piggy bank unless you cut an access point somewhere else.

 Once the piggies were dry I made some ears and tails out of air dry clay and attached them using hot glue.
 Then I took the piggies outside and gave them a coat of spray paint. I used grey primer because I knew it would cover the words on the newspaper, but you could easily do any other color, or even do acrylic paint. 
 I left the piggies grey because the kids will each get to color/decorate their own piggy. Here are all the piggies drying in the sunshine.
Next I drilled 2 holes in each piggy to make cutting out the coin slot easier. Excuse my finger in this picture. I was trying to hurry because it was thundering outside and I didn't want the poor piggies to get wet.
Then I used the two holes to cut out the coin slot by cutting from hole to hole on each outer side of the hole. Once this was done I opened each piggy up to peel off the painters tape that was protecting the threads from paper maché and paint.
 Here they are all lined up before I had to make a mad dash to get them and myself inside before we got soaked.
Once I had them inside I glued on some google eyes for fun. I did it because I used hot glue and I didn't want the kids burning themselves, if you have ever gotten high temp hot glue on your finger by accident you know how bad it hurts.
Here are the birthday boys and our guests decorating their Hamms. I decided to stick with washable markers and stickers to make clean up the easiest and fastest.


Saturday, August 3, 2013

Saturday August 3 2013 (Toy Story Birthday Party)

TOY STORY BIRTHDAY PARTY

This year the boys decided they wanted a Toy Story birthday party so of course I put one together for them. This post is mostly pictures of the party and things that were at it. I will post some blogs with how to's for some of the projects that I did for their party when I manage to recover from it!
This is the invite I came up with for the party, No I did not send out a blurry copy that's just for privacy purposes. I decided to go with the simple Etch-A-Sketch to make it simple but bold. I printed them on photo paper then attached them to card stock so they would fit easily in the envelope. I also attached directions to the venue on the back so that less people would get lost.
It's a party in a car! Luckily our car has lots of storage space, especially when you lay down the back seats.

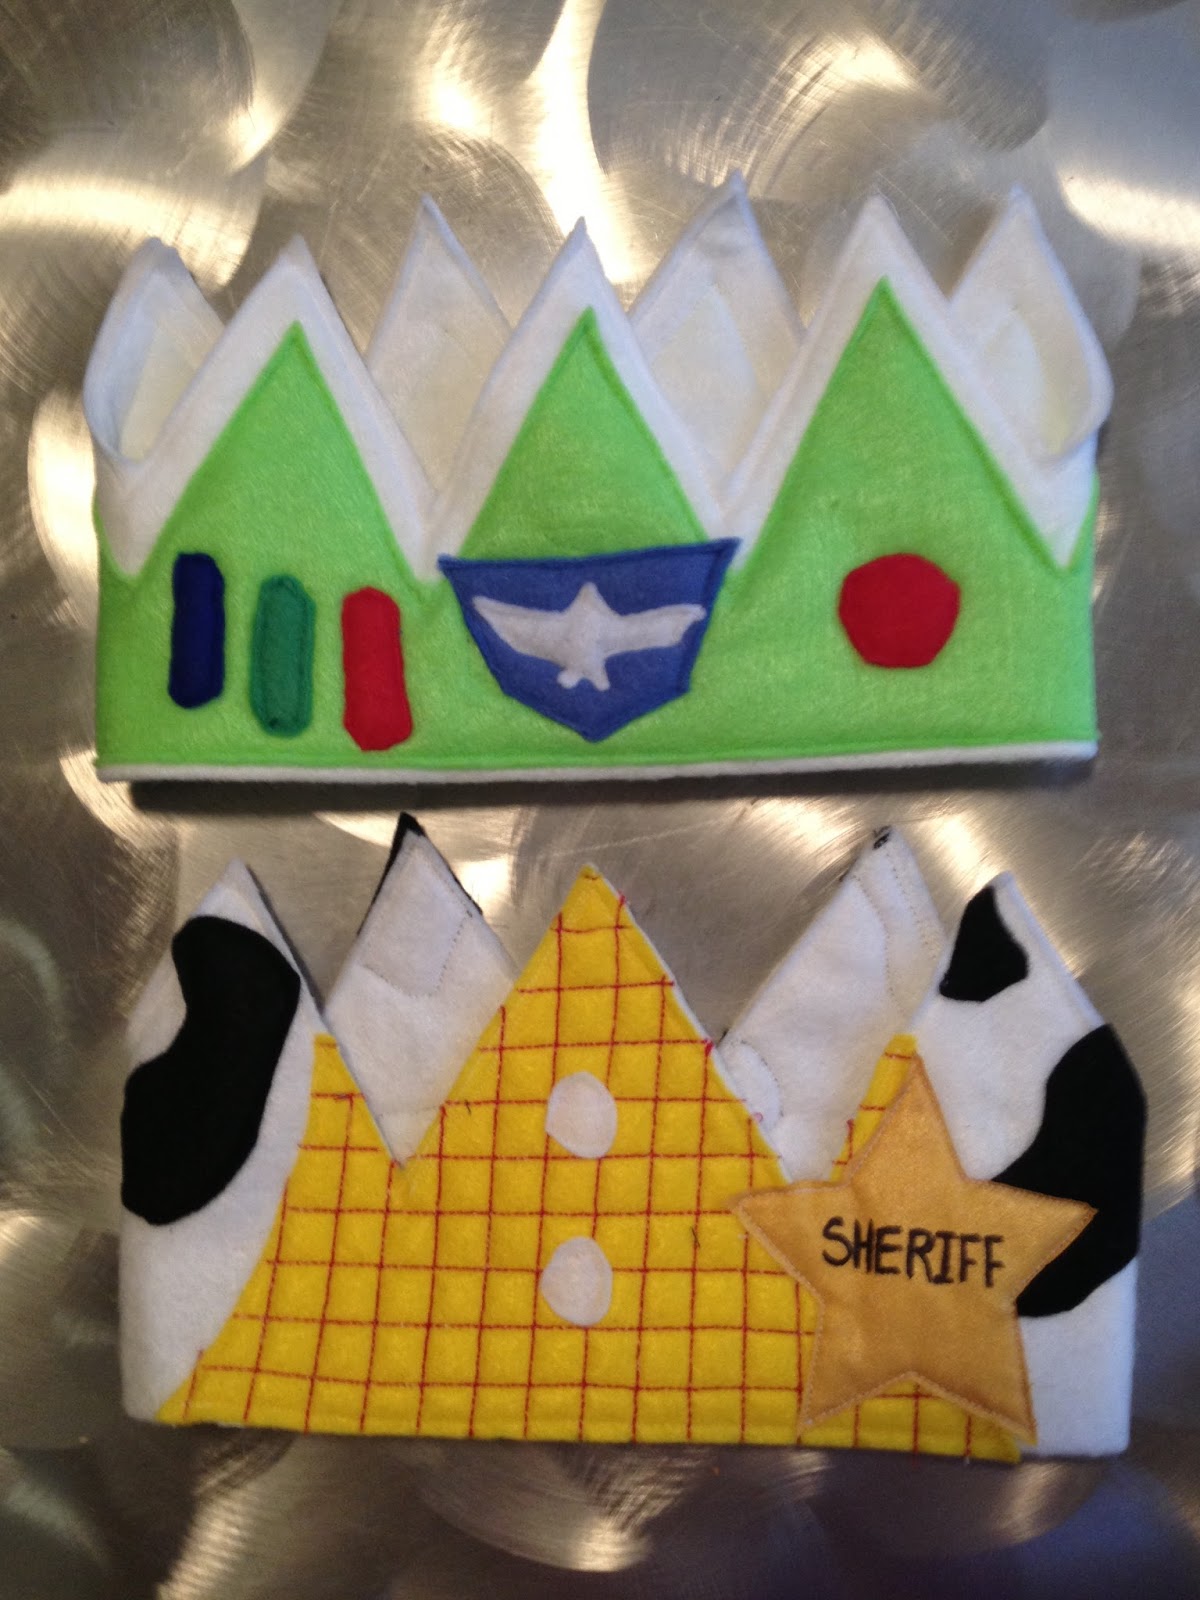
Here are the Birthday Boys! I made the shirts and the felt crowns for their special day. Of course they will keep the crowns for playtime and the shirts make great play wear.

Here are some pictures of the entryway before the guests started to arrive
Some army men were zip-lining above the gift table and the "goody bag" room was filled with what else but the party favors! Big thanks to my mom who helped me to decorate!

The focal piece of the party was the dessert table with the hand made banners hanging above it. I don't have a fancy cutting machine so I cut everything out by hand.

A close up of the dessert bar. The sign on the left says "You are so sweet for coming to celebrate our birthdays with us, so please take something sweet home with you!" The one on the right is a 'Dessert Menu' we had Jessie Hats, Woody badges, Buzz ships, Mr. Potato Head mustaches, Alien cake pops, Toy Story Ball cake pops, Slinky Dog Puppy chow and Woody's "Hot Shmoes" cookies.

Some close ups of the desserts. The aliens and Toy Story balls are a little shaky, but that's unfortunately what happens when you make them at 11pm with only a couple hours sleep the night before. At least it all tasted good!
Our first activity was the obstacle course which the munchkins had to complete in order to rescue some oversized Toy Story soldiers!

We had to zig zag through the cones
crawl through the tunnel. Then jump over some pool noodles, crawl through a rope web and walk a line of bricks (most of which we didn't get pictures of because the parents were helping the munchkins)
At the end we had to knock down some cans in order to save the soldier!
We also had a Buzz Lightyear Ship piñata that I put together.
The kids all took turns hitting it. We went from littlest to biggest just to make sure everyone had a fair chance. We tore the top off though so daddy got to smash it open while mommy was holding it.
The birthday boys and their piñata spoils.
All of the kids got to decorate their own Hamm the piggybank with stickers and markers before we had cake.

The birthday boys got to blow out their candles on the cakes that mommy made for them.
We played pin the parts on Mr. Potato Head.
The end results.
Here is a close up of the goody bags.
Here is the contents of the goody bag. A Galaxy in a bottle, a Toy Story Themed T-shirt, a 'Reach for the Sky' Kite, a snake in a boot, some toy story themed stickers, a toy story themed kleenex pack that the oldest munchkin insisted on and although you can't see them in this picture there was also a soldier in a soap, toy story balloon and a sheriff's badge with their name on it.
Here is a close up of the soap and Snake in a boot.
Here is a look at the shirts that were in the bags.


Some of my favorite moments from the birthday party. the Mater LOVES his cake pops and the Rooster was going so non-stop that we barely got any pictures of him that aren't blurry!
Overall it was a fun party and I know the boys had a great time and loved having all of their friends over to share it with them!