Sunday, May 18, 2014

Sunday May 18th 2014 (Easy Green Chile)

Easy Green Chile

In Colorado you can find Green Chile on almost anything, hot dogs, fries, burgers, burritos, hash browns you name it. There are lots of jarred or frozen versions available, but there aren't any that compare to a bowl of freshly made green chile and it smells great too! Here is my (err... my mom's really) recipe for fast and easy green chile so you can have a nice big bowl or smother anything your heart desires.

Ingredients

1 tbsp of minced garlic
2-3tbsp of olive oil
1 medium sized pork loin
8-10 medium roasted/grilled Anaheim peppers skinned, deveined and deseeded
1 can of petite diced tomatoes drained (save juice)
64oz vegetable broth
2tbsp-1/3cup flour (for thickening)
pinch of sugar to cut acidity (optional)

Directions

Heat olive oil in the bottom of a large pot
Brown garlic lightly in the same pot.
Add pork loin chopped into bite size or smaller pieces ( I use meat scissors and chop it directly into the pot to save on some dishes as well as time) brown pork loin till it is cooked thoroughly.
While pork is browning chop or food process the peppers into approximately 1/4 pieces.
Add the peppers as well as any juice from the peppers into the meat as well since a lot of the flavor is in the juice.
Cook for 3-4minutes to allow the peppers to heat up with the pork and the flavors to mingle. 
Add the drained petite diced tomatoes, DO NOT discard the juice yet!
Add about 48oz of the vegetable broth into the pot and allow to heat to a simmer.
Take about 1/3 of the remaining vegetable broth and in a separate bowl whisk in a couple tablespoons-1/3cup of flour into it. How much flour you add determines how thick you want the chile. (I personally prefer my chile fairly thick and use about 1/4-1/3 of a cup) pour the slurry into the chile and stir. If you need to thicken it up use either some of the remaining vegetable broth or spoon some broth out of the chile and whisk the flour into it first or you will get flour lumps (they don't taste very good)
Now you get to do a taste test! When doing a taste test make sure that you allow the sample to cool or else it will seem spicier than it actually is. If the chile is too acidic add a pinch or so of sugar to help cut the acidity. If the chile is too spicy add some of the tomato sauce from the diced tomatoes. If you use up all of the tomato sauce and it is still too spicy use some or all of the remaining vegetable broth to help cut down the spice as well. Once you get the taste just right let it simmer till the rest of your food is ready and then dive in!
Our favorite way to eat the green chile is over shredded rotisserie chicken and bean burritos.

Saturday, November 23, 2013

Saturday November 23, 2013 (cookieception)

Cookieception!


So I've had the idea of cookieception ever since seeing the pictures of oreos stuffed inside of chocolate chip cookies on Pinterest. But most of what I saw was store-bought cookies inside of a home-made cookie. So I wondered what other kinds of cookies would make a delicious cookieception. It hit me one day while I was eating a Reese's Peanut Butter cup. This would make a delicious cookie! 
I decided I'd whip up some Peanut Butter cookie dough and then some Chocolate chocolate chip cookie dough and mess around till I figured out the best way to do cookieception. Knowing that Oreos and Vanilla Wafers are pre-baked I decided to test out baking the peanut butter cookies first, waiting for them to cool and then wrapping them in the chocolate chocolate chip cookie dough and then baking again. This was a perfectly viable option and tasted good, but it seemed like a lot of extra work baking then waiting for the cookie to cool and then wrapping it and re-baking it. So I decided to skip the baking step and took a ball of peanut butter dough wrapped it in chocolate chip cookie dough and baked it, for a slightly longer period of time than I normally do and it worked wonderfully! Anyways enough about my struggles to figure out the best way to do cookieception, here is the recipe and instructions.

Ingredients


Peanut Butter Cookie Dough (PB Cookie Dough)
1/2 Cup Shortening
1/2 Cup Peanut Butter
1/2 Cup Sugar
1/2 Cup Brown Sugar (packed)
1 egg
1 1/4 cup flour
1/2 tsp Baking powder
1/4 tsp salt
3/4tsp Baking Soda

Chocolate Chocolate Chip Cookie Dough (CCC Cookie Dough)
1 cup softened butter
3/4cup sugar
3/4cup brown sugar
1/3cup unsweetened cocoa powder
1/2tsp vanilla
2eggs
2 1/4 cup flour
1tsp baking soda
1/2tsp salt
2cups chocolate chips


Directions
-Preheat the oven to 375degrees F 
-Then make the PB Cookie Dough. Cream together the shortening, peanut butter and sugars. Then add the egg, salt, baking powder, baking soda and mix thoroughly. Last add the flour.
-Once these are made roll them into little balls roughly the size of a marble. Set aside on an extra plate/bowl/cookie tray.
-Next make the CCC cookie dough. Cream together the butter, sugars and cocoa powder. Then add the eggs and vanilla and mix well. Last add the Flour, baking soda, salt and mix till a nice dough is formed. Fold in the chocolate chips. I personally used the mini-chips because they are easier to flatten for the next step.
-Take a tablespoon sized glob of CCC cookie dough and flatten it out into your palm, put a PB cookie dough marble in the center and wrap the CCC cookie dough around it to conceal the entire PB cookie dough ball. If you have a lot of excess CCC cookie dough feel free to pinch some off to save for other cookies. Or if you don't have enough you can always add a little more. Once the entire PB cookie dough ball is concealed you can roll it GENTLY to make a smoother cookie dough ball if you like. Each ball should be roughly the size of a golf ball. 
-Place on an ungreased cookie tray about 2.5" apart and bake for approximately 10-12min. The recipe yields a LOT of cookies about 75 2-3" cookies, you can always cut the dough recipes in half or make bigger cookies (cook them longer or the peanut butter dough will be raw) The dough also freezes well so you could make them all and just take them out as you need them.

These turned out so well that I will definitely have to experience with more cookieception in the future. Hope you enjoy your cookies!

Friday, November 15, 2013

Thursday October 31st 2013 (Halloween Costumes)

Halloween Costumes

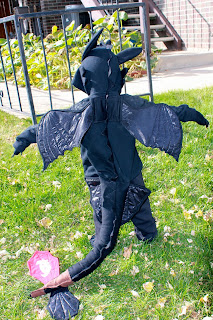
So this is more of a look what I did than a tutorial. But If you have any questions on how I did anything feel free to contact me and I'll get back to you as soon as I can. This year's costumes were Toothless the Dragon and a Train Driver.
The Train driver is just a pair of OshKosh overalls with a white long sleeve shirt and a train driver hat. I made this one, but they had them available at the OshKosh store for $15
Toothless was a little more complicated. It's a black Hoodie and I attached Spikes, ears, wings and a tail using fabric from Joann's. I also added some "scales" using fabric paint on the hoodie. The pants were just black sweatpants. We put old black socks over his shoes and glued felt "claws" onto some black mittens. The plan was originally to paint his face black and add green eyes around his eyes, but I got lazy when I realized how much of a pain it was going to be to keep a 3year old from rubbing his face and getting face paint everywhere...


Saturday, September 21, 2013

Saturday September 21, 2013 (Better than Granola Bars- breakfast cookies)

Better than Granola Bar Breakfast Cookies

If you are anything like me, you have to drag yourself out of bed in order to get breakfast taken care of for the kids if not just for yourself. I can do it, but most mornings I totally wimp out and let the kids have cereal/granola bars or even the dreaded pop tart because I'm not in the mood to fight them. I started the school year off with making home-made muffins for breakfast, then realized that they were going to get tired of them quickly. So back to the drawing board, then I remembered making these "low cal" healthy oatmeal cookies and lightbulb! Why not make breakfast "cookies" The best part, my kids don't even know they are healthy (insert evil laughter here) because I call them "cookies" and what child if offered a cookie for breakfast wont jump at the chance. The best part is these cookies are completely customizable, make them like your favorite granola bar! Plus they store well in an air tight container and stay soft, have no preservatives and they can be gluten free depending on what you decide to add of course. The recipe also doubles/triples well. They may not look pretty, but they taste great!

Base Recipe
2bananas 
(I used the ones that were starting to turn brown on my counter and they worked just fine)
1.25cups oatmeal (I used quick oats but you could use any kind)

That's it! Seriously! You just mash the bananas till they are nice and smooth and then stir in the oatmeal. I used a medium sized ice cream scoop then pressed them down a little bit. Bake at 325 on a lined cookie sheet for 15min and your done! (This recipe yielded about a half dozen cookies)

Here are some ideas for add ins!

Chunky Monkey Breakfast cookies
Base Recipe
2-3TBSP chocolate chips
2-3TBSP peanut butter

Cinnamon Raisin Breakfast Cookies
Base Recipe
1/4cup raisins
1TBSP cinnamon

Almond Joy Breakfast cookies
Base Recipe
1/4cup shredded coconut
1/4cup chocolate chips
1/4cup sliced/chopped almonds

Tropical Breakfast cookies
 Base Recipe
1/4cup shredded coconut
1/4cup dried pineapple/mango

Stay Healthy Breakfast cookies
Base Recipe
2TBSP Almond butter
1TBSP Honey
2TBSP Cinnamon

If you come up with any other great combos feel free to share them with me! If they are not sweet enough for you I recommend using honey instead of sugar, it tastes better without changing the consistency of the cookie.

Thursday, August 15, 2013

Thursday August 15 2013 (Butterbeer cookies)

Browned Butter, Brown Sugar Butterbeer cookies

There are LOTS of Butterbeer cookies out there on the internet, but I couldn't find one that sounded right to me, so I made up my own recipe. Let me just say if you are on a diet DO NOT make these cookies. They smell like heaven and you cannot eat just one. Or at least I couldn't!

The Recipe
1 cup of browned butter
1 cup brown sugar
1/3cup regular sugar
3/4tsp baking soda
1/2tsp salt
1tsp vanilla or butter flavoring
1tsp butterscotch sauce (ice cream topping)
2 2/3cup flour
2 eggs
1 package butterscotch chips ground up
1/3package white chocolate chips ground up

First things first brown your butter. Basically you melt it in a pan and whisk it (so it doesn't burn) until it turns a nice amber color and gets a nutty smell. Whisk constantly and do not leave it unattended or you will burn it! Pour it into a container and put in the fridge to solidify, but do not let it get hard. If you do you will need to take it out and leave it on the counter until it softens back up. Once this has all been done beat the butter and then add the sugars and beat them until they are well creamed together. Add the baking soda, salt, vanilla, butterscotch sauce and mix till incorporated.
Add the flour and eggs and mix till a nice smooth dough is formed.
Put the butterscotch chips and white chocolate chips into a blender or food processor and grind them till they are nice and small. (You can skip this step if you want bigger chunks in your cookies, but by blending it you get a more consistent butterscotch taste to your cookies) Mix the blended chips into the dough. Roll into balls and bake at 325 for 10-15min depending on the size of the cookies.

Monday, August 5, 2013

Monday August 5 2013 (Galaxy Jars)

Galaxy Jars

One of the fun goodies the boys and I made for the goody bags at their birthday party were Galaxies in a Jar. The concept is very similar to the calm down jars that have been floating around Pinterest for a long time. 
First we collected a bunch of smallish clear bottles. Then we filled them 95% full with water. Then we added a few drops of glycerine (they sell this in the soap area at Hobby Lobby) You could also use clear glue, but I already had glycerine on hand. Then we filled the rest of the bottle with glitter and mini-star confetti.
After we had all the glitter and confetti in the bottle with the distilled water and glycerine we put a line of high temperature hot glue around the top of the bottle before we screwed the lid on. This will "kid-proof" the bottle so that there aren't accidental spills in the house.
 I decided to give the lids a coat of glittery spray paint too just to make them even more fun.
 To finish them off we tied a card that reads "Galaxy in a bottle. To infinity and beyond!" to the bottle with some extra ribbon I had.


Monday August 5 2013 (Up-Cycle Piggy banks)

Up-cycle Piggy Banks

So I decided this year that I would provide a craft for the kids to do at the birthday party while the boys open their gifts. This way they don't get bored, and they get another fun thing to take home with them. I was originally going to get each kid a ceramic piggy bank to decorate, but after thinking about how preschoolers and glass don't mix well plus the fact that a decent size ceramic piggy bank starts at $3 I decided I would take the initiative and make piggy banks out of air dry clay, plastic wide mouth jars and paper maché. The first thing I had to do was collect enough plastic containers. Luckily for me my family was able to help me collect a bunch. Then I used air dry clay to make four little legs for each container. I used some painters tape to tape off the threading at the top of the jar so that the lid would still screw on afterwards.
 I attached the legs to the jar using hot glue.
Then I used paper maché to cover the body of each piggy and snout (the lid) separately and allowed them to dry. If you don't do the maché separately you won't be able to remove the lid to open the piggy bank unless you cut an access point somewhere else.

 Once the piggies were dry I made some ears and tails out of air dry clay and attached them using hot glue.
 Then I took the piggies outside and gave them a coat of spray paint. I used grey primer because I knew it would cover the words on the newspaper, but you could easily do any other color, or even do acrylic paint. 
 I left the piggies grey because the kids will each get to color/decorate their own piggy. Here are all the piggies drying in the sunshine.
Next I drilled 2 holes in each piggy to make cutting out the coin slot easier. Excuse my finger in this picture. I was trying to hurry because it was thundering outside and I didn't want the poor piggies to get wet.
Then I used the two holes to cut out the coin slot by cutting from hole to hole on each outer side of the hole. Once this was done I opened each piggy up to peel off the painters tape that was protecting the threads from paper maché and paint.
 Here they are all lined up before I had to make a mad dash to get them and myself inside before we got soaked.
Once I had them inside I glued on some google eyes for fun. I did it because I used hot glue and I didn't want the kids burning themselves, if you have ever gotten high temp hot glue on your finger by accident you know how bad it hurts.
Here are the birthday boys and our guests decorating their Hamms. I decided to stick with washable markers and stickers to make clean up the easiest and fastest.