Saturday, July 27, 2013

Saturday July 27 2013 (Wedding goodies)

My Cousin's wedding!

     Today's blog is more of a sharing ideas than a tutorial. Yesterday my cousin got married so today I decided to share with you some of the elements of the wedding that I helped with. As I get better pictures I will be sure to add to them!
First up are the Deco-mesh flowers that we used to add some color to the curtains. These things were a royal pain in the butt to make, but they added some color and a little bit of pop to the space.
The superhero shirts were for the groomsmen and the groom. They had a superhero logo on the front and their nickname on the back. I "screen printed" all of these for them to wear underneath their suits.


 I made these satin flowers for the bridesmaids hair just for a little bit of color. I also did the bridesmaids' hair as well as the bride's. Although the bride did have to help me pin my hair up, because unfortunately I cannot see the back of my head. That would come in SO handy with the munchkins!
 

These are pictures of the "toss bouquet" I made. I made a BUNCH of flowers to try and figure out what we wanted to use for our hair and of course I couldn't just let the extra ones I made go to waste! Plus this way the bride didn't have to throw her gorgeous real flowers that don't hold up very well to being thrown.
This is a terrible picture of it, but this is the hairpiece that I put together for the bride. It's saltwater pearls and swarovski crystals. It gave her the perfect amount of bling to complement her dress.

In Japanese culture the 1000 cranes represents good luck, so one of the other bridesmaids and I folded the 1000 cranes and the other bridesmaids picked a shadowbox to showcase them in. This was our gift to the bride and groom.

In closing I would like to say congratulations to them and that I hope they have many happy and prosperous years ahead of them!


Monday, July 22, 2013

Monday July 22 2013 (Bachelorette Party)

Bachelorette Party Fun

My cousin is getting married in a couple of days, but we held her bachelorette party early per her request. There was of course body part themed cake, cookies, cake pops as well as some other items, but since this is a family blog I will try to keep it as clean as possible. First up we decided that since it was just a small group of us at the bachelorette party we would go out to dinner then go back to one of the bridesmaids houses to finish celebrating. My favorite thing that we decided to do was matching shirts for all of the "party" goers. I have a thing for tie dye so of course we had to do that. My cousin isn't real big on any super bright colors and mostly likes earthy tones so we went with blues and greens. Here is how I made these nifty Tie-Dye shirts.
First you take a white shirt and draw the shape that you want on it. In this case I did hearts because it seemed appropriate. I used a washable marker so that it would come out when I washed it. Next use some dental floss to sew around the outline and pull it tight.

Once this is done you will rubber band around the colored line, make sure to do so tightly and for a more defined shape use a thicker rubber band. Then Go to town with any kind of tie dye technique you choose. One of the other bridesmaids graciously helped me with the dying since I was also trying to supervise the munchkins who were dying shirts of their own.
After I finished the shirts I decided with as hot as it has been that tank tops might be better than T-shirts so I cut them up.
The sleeves and collar get cut off first 
Next you flip the top over once and hem to form a pocket. I made mine about 3/4"
Cut off the cuffs of the sleeves and thread through the pockets. I've found using a safety pin to help drag it through helps a LOT.
Take the straps on each side and sew them together.
You will get something like this
Here are the six shirts for the partygoers
I "specialized" the Bride's a little bit using a stenciling technique
I turned the remainder of the sleeves into matching headbands for the shirts.
I put each shirt and headband into a canning jar with each person's initial etched into the glass. I also sealed the jars with a scrap of the shirt and a washer on elastic with each guest's name stamped on it. We used the jars for water at the party and the elastic and washers made GREAT tags for the other glasses so that nobody's drinks got mixed up.
Here is the bride to be sporting her custom tie-dye top and the lovely glittery tutu that one of the other bridesmaids made for the occasion.

Monday, July 1, 2013

Monday July 1 2013 (Jake and the Neverland Pirates Birthday Party)

Jake and the Neverland Pirates Party

So this is actually about the birthday party I threw for the boys LAST year, so unfortunately I don't have any tutorials with extra photos on how I made everything, but I thought I would share some of the things that I did anyways.

This was the invitation that I came up with. I made it by printing and then cutting and pasting all of the individual elements.

The Banner was made by Cutting out Scrap booking paper and gluing it to cardstock. I don't have one of those fancy cutting machines so I did it all by hand.
I made the main characters from the show by using a projector, poster board and craft paint. They were scattered around the party area as decor and afterwards they went into the boys' bedroom.


Here is the cake table. The canon was made out of rice krispies, the cake was made using 2 9x13" sheet cakes that I cut into sections. The rails and ship's wheel were made using dipping chocolate and the Mast/sails were made out of some printer paper and a dowel.
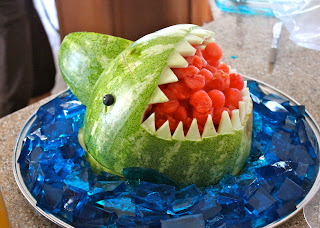
We had Pirate themed food like this watermelon shark swimming in blue jello and Sand pudding which was vanilla pudding with crushed up vanilla wafers on top (sorry no picture of that one)

After Lunch we had a treasure hunt which included a ride down the slide and walking the plank then ended with a treasure chest filled with rolo's (because they are gold) for a treasure.
We also had a Canon ball balloon pop with black balloons filled partially with water.

Here is one of the birthday boys with his "canon ball".
I also made a gold doubloon piñata for the kids using poster board and paper maché. I learned my lesson to only do 2-3 layers. This one had 8 and it took a T-ball bat and the hubby to get it open. (OOPS) It was filled with mardi-gras necklaces and Werthers butterscotches because they look like gold and jewel treasure.
Luckily I had also made some mini-piñatas in coconut form that the kids were able to open on their own.
We also had giant bubbles for the adults and kids. A lot of the kids went back outside to play with them while the boys were opening their gifts after cake.
The boys ate some cake, but they like cake-pops better.
Here is the goody bag room. Each kid got a Jake and the Neverland Pirates balloon, balloon sword, bandana, turtle, pixie dust, jellyfish in a bottle as well as a bag full of goodies.

Here are the contents of the goody bags. The bigger kids got a bag of home-made chalk, 2 Jake and the Neverland Pirates necklaces, 2 rock candies on a stick, some glow sticks and a Jake and the Neverland Pirates coloring book. The little kids got a foam water ball, bib and onesie (It says Yo Ho Ho 7 A Bottle of Milk) 
The bags were just brown lunch bags with the kids names and a Skull and bones logo that I cut out of craft paper.
Overall the kids had a GREAT day and that's what really matters to me.